How to create a form from JSON schema using react-hook-form

Creating forms is one of the essential tasks of a web developer. In any production website or app, you would need to create at least one form. Building forms might involve a lot of copy and pasting of code. It would be nice if we could automate some of the processes of creating a form. In this tutorial, we are going to see how to create a form using JSON configuration.
Why use JSON to create a form
Before getting into code, let us briefly see why you would want to use JSON when building a form. I see some advantages in using JSON to build a form. One advantage is that the code of the form will be less verbose. You do not have to define multiple inputs in a single form. Another advantage is that controls can be generated dynamically. You can store the configurations in a file or database and read them to generate the form. If you have a use case where a form needs to be generated dynamically, like a survey app for example, then using a JSON object to generate a form would be great.
There are also some drawbacks though. It is harder to apply styles to the layout of your form. You may not be able to freely arrange the controls in the way you want. Applying complex validations for each individual control may also be hard to implement.
Technology
In this tutorial, we are going to use TypeScript. TypeScript helps in making sure that the JSON contains all the necessary properties for the form to work (+ the nice auto-completion feature provided by the IDE). We are also going react-hook-form library. It is easy-to-use, lightweight, and performant, and it takes advantage of react hooks.
I have created a codingsandbox project for this tutorial which you can play around with it. To begin, install react-hook-form library.
npm i react-hook-form
npm i -D @types/react-hook-form
Note: This tutorial uses react-hook-form v7 and above. The API for versions below v7 is slightly different and might not work with this tutorial.
Defining the structure of JSON
We need to first define the properties of our JSON to render the controls in the form dynamically. Create a TypeScript file called dynamic-control-types.ts which contains the types and interfaces for the JSON.
import { RegisterOptions } from "react-hook-form";

export type ControlType = "text" | "select" | "number" | "checkbox";

export interface SelectOption {
  label: string;
  value: string;
}

export interface DynamicFieldData {
  label: string;
  inputType: ControlType;
  fieldName: string;
  defaultValue: any;
  options?: SelectOption[];
  config?: RegisterOptions;
}
The keys of the JSON object are described in the DynamicFieldData interface. Most of them are self-explanatory, but I would like to briefly talk about the inputType, options, and config properties. The inputType is what determines the type of the input control in the form. It can be a text input, a select, number, or a checkbox, and it can add extended to other types. Then we have the options property. This property will only be needed if the inputType is select, hence it is made optional.
The config property is interesting. It is of type RegisterOptions imported from the react-hook-form library. In this config property, we could configure our validations and behavior of the input.
The config object looks something like this:
{
  required: "This is Required",
	maxLength: 10,
	minLength: 1,
	pattern: /[A-Za-z]{3}/,
	validate: (value) => value >= 10
}
You could read all the available options in the documentation .
Setting up the form component with useForm hook
Now that we know what the data will look like, let us create the form. Inside the Form.tsx file, add the following Form component.
import { FormProvider, useForm } from "react-hook-form";
import { DynamicFieldData } from "./dynamic-control-types";

interface FormProps {
  fields: DynamicFieldData[];
}

export const Form = ({ fields }: FormProps) => {
  const formMethods = useForm();

  return (
    <form>
      <FormProvider {...formMethods}>
        {fields.map((d, i) => (
          <div key={i}>
            <label htmlFor={d.fieldName}>{d.label}</label>
			// input controls will be rendered here
          </div>
        ))}
      </FormProvider>
      <button type="submit">Submit</button>
    </form>
  );
};
Here are some important things to notice in the code above. First, the list of configurations for the form controls is passed as props. Then inside the component, the useForm hook provided by the react-hook-library is used to return the properties and functions needed to manage the form. Later, we will see some of the specific functions returned by the useForm hook.
We also use the FormProvider component from the react-hook-library to access the functions returned by useForm in different files. We pass all the form methods returned by useForm into the FormProvider. As the docs say, FormProvider is intended to be used for deeply nested structures. It uses the React useContext hook behind the scenes to avoid the passing of form context around.
If we don’t use FormProvider, we have to write all of the different types of inputs in this component, and it will be a long list depending on how many kinds of components we want to manage. But with FormProvider, we are able to separate the generation of controls in different files. We can take advantage of this to make the code shorter and cleaner.
Creating the dynamic controls
Now let us create a component that will render the input depending on the type of input we provide. Inside DynamicControl.tsx, copy the following code.
import { useFormContext } from "react-hook-form";
import { DynamicFieldData } from "./dynamic-control-types";

export const DynamicControl = ({
  inputType,
  fieldName,
  defaultValue,
  options = [],
  config = {}
}: DynamicFieldData) => {
  const { register } = useFormContext();

  switch (inputType) {
    case "text":
      return (
        <input
          type="text"
          {...register(fieldName, config)}
          defaultValue={defaultValue}
        />
      );
    case "select": {
      return (
        <select
          {...register(fieldName, config)}
          defaultValue={defaultValue}
          name={fieldName}
          id={fieldName}
        >
          {options.map((o, index) => (
            <option key={index} value={o.value}>
              {o.label}
            </option>
          ))}
        </select>
      );
    }
    case "number":
      return (
        <input
          type="number"
          {...register(fieldName, config)}
          defaultValue={defaultValue}
        />
      );
    default:
      return <input type="text" />;
  }
};
This component will receive the configuration for the input control.
One of the functions returned by the useForm hook is the register function. The register function allows us to register the control into the React Hook Form so that its value can be tracked and validated. It accepts a unique name for the input and a config option for validation. We already have these properties available in our props. To use the register function, we spread its properties in the input. We use the register function in all the different kinds of input to register them in our form.
Although we don’t use the useForm hook here, the register function is available from the useFormContext hook. We made it available through the form context provider, and it can be used anywhere in the children component of the provider.
We are going to use the DynamicControl component inside our Form component to render the input dynamically. Inside Form.tsx, add the highlighted line:
{fields.map((d, i) => (
  <div key={i}>
    <label htmlFor={d.fieldName}>{d.label}</label>
	<DynamicControl {...d} />
  </div>
))}
Render the form
So far we have created the Form and DynamicControl components but we aren’t using them anywhere yet. Before we can render the form in the App component, why don’t we first create the real JSON data?
Inside data.ts, add the following code. We are going to type the configurations with the TypeScript interface DynamicFieldData we have defined in the first section of this tutorial.
import { DynamicFieldData } from "./dynamic-control-types";

export const fields: DynamicFieldData[] = [
  {
    fieldName: "name",
    inputType: "text",
    label: "Name",
    defaultValue: ""
  },
  {
    fieldName: "age",
    inputType: "number",
    label: "Age",
    defaultValue: 18
  },
	{
    fieldName: "language",
    inputType: "select",
    label: "Language",
    options: [
			{ value: 'english', label: 'English'},
			{ value: 'french', label: 'French'}
	],
    defaultValue: "english"
  },
  {
    fieldName: "address",
    inputType: "text",
    label: "Address",
    defaultValue: ""
  }
];
Here we are simply exporting the configurations of our form field controls. Now that we have the JSON field configurations, let us render the Form component. Inside App.tsx, import the Form component and pass to it the JSON configuration defined above.
import "./styles.css";
import { fields } from "./data";
import { Form } from "./Form";

export default function App() {
  return (
    <div className="App">
      <h1>Dynamic form</h1>
      <Form fields={fields} />
    </div>
  );
}
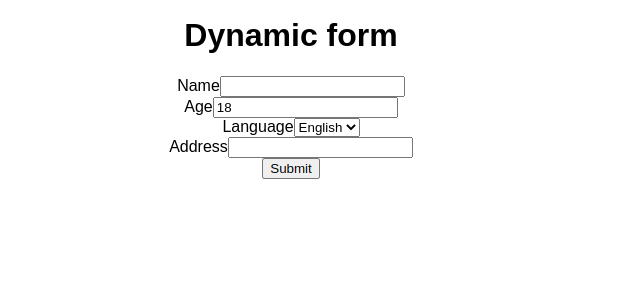
If everything goes well, you should see something like this.
Submitting the form
React hook form library provides a function to submit the form. One of the properties that the useForm hook returns are the handleSubmit function. It is a function that returns another function.
It accepts two arguments. The first argument is the successful callback along with the form values when the form is valid. The second argument is the error callback along with the error when the form is invalid.
Let us see how we can handle the form submission in our Form component.
const formMethods = useForm();
  const {
    handleSubmit
  } = formMethods;

  function onSubmit(data, error) {
		// your logic on what to do with data
    console.log(data);
  }

  return (
    <form onSubmit={handleSubmit(onSubmit)}>
      <FormProvider {...formMethods}>
        {fields.map((d, i) => (
          <div key={i}>
            <label htmlFor={d.fieldName}>{d.label}</label>
            <DynamicControl {...d} />
          </div>
        ))}
      </FormProvider>
      <button type="submit">Submit</button>
    </form>
  );
We destructure the handleSubmit function from the object returned by the useForm hook, then we use it on the onSubmit event handler of the form.
It would be nice if the user submits the form, the submit button will be temporarily disabled so that the user doesn’t accidentally submit the form twice. That is easy to achieve with react-hook-form.
useForm hook returns another property called formState that holds information about the state of the form. We can extract isSubmitting property to know when the form is being submitted.
Let us make some changes in our form. When the user is submitting the form, we will disable the button and change the text of the submit button to ‘Submitting’. Inside Form.tsx, make the following changes.
const formMethods = useForm();
  const {
    handleSubmit,
		formState: { isSubmitting }
  } = formMethods;

	// other code ...
  return (
    <form onSubmit={handleSubmit(onSubmit)}>
		{/** other code ...*/}
      <button type="submit" disabled={isSubmitting}>{isSubmitting ? 'Submitting' : 'Submit'}</button>
    </form>
  );
Adding validations and showing errors
We can submit our form without any sort of validation. In production apps, however, we will need to verify values entered by users. To add validations in our dynamic form, we simply need to add the config object in our JSON.
In our example, let us make the name and age field required, and let us also require that the age is greater than or equal to 18. In the data.ts, add config properties to the object for the name and age fields.
export const fields: DynamicFieldData[] = [
  {
    fieldName: "name",
    inputType: "text",
    label: "Name",
    defaultValue: "",
    config: {
      required: "Required"
    }
  },
  {
    fieldName: "age",
    inputType: "number",
    label: "Age",
    defaultValue: 18,
    config: {
			required: "Required",
      validate: (value) => value >= 18 || "Still a minor"
    }
  },
	// ... other objects
];
The required and validate properties are provided by the react-hook-form library. There are many other properties available. If you want to know more about what properties can go into the config object for each field, you could check the documentation of react-hook-form here.
Now when you submit the form without entering any values, it will not submit (nothing shows in the console) because the form is still invalid. We are not seeing the errors making the form invalid, however. To show the errors, we need to get the errors in the form state and show them to the user.
formState returned by the useForm hook contains the validation errors of the form. We can extract this property.
const {
    handleSubmit,
    formState: { isSubmitting, errors }
  } = formMethods;
To show the error message, we can simply render the errors in a div in the form, or we can also use nice error message component provided by react-hook-form library. We have to install it separately because it isn’t available when we installed react-hook-form library.
npm install @hookform/error-message
Let us modify our Form component to render the validation errors.
<form onSubmit={handleSubmit(onSubmit)}>
      <FormProvider {...formMethods}>
        {fields.map((d, i) => (
          <div key={i}>
            <label htmlFor={d.fieldName}>{d.label}</label>
            <DynamicControl {...d} />
            <ErrorMessage errors={errors} name={d.fieldName} />
          </div>
        ))}
      </FormProvider>
      <button type="submit">Submit</button>
    </form>
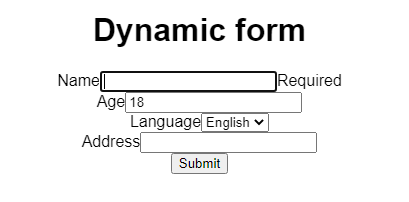
We have to pass the name of the registered field in the form and the errors object. Now if we try again to submit the form without any values, it will show the error message beside it.
Conclusion
In this tutorial, we saw how to create a form using JSON objects. We used react-hook-form to handle anything related to forms — validations, states, and submission. The tutorial is just a starting point, but you can extend it to your use case. For example, you can use 3rd party UI libraries like Chakra UI, Material UI, Semantic UI, etc. to render the dynamic controls.
Here is the codingsandbox for this project. Play around with it to see what works and what doesn’t 😀
- Authors

- Name
- Naina Razafindrabiby
- @nr_razz